
I still remember my first sip of fizzy, tangy kombucha – that perfect balance of sweet and sour dancing on my tongue. Like many health-conscious Americans, I’d been buying those $4 bottles weekly, wondering if crafting this effervescent elixir myself was possible. Then I discovered a truth that changed my kitchen forever: creating probiotic-rich fermented tea requires less effort than brewing morning coffee.

Over 10,000 home enthusiasts have transformed their spaces into fermentation hubs using this method. The journey unfolds in three phases: nurturing a living starter culture, fermenting sweet tea into tangy liquid gold, and infusing bubbly personality through natural carbonation. You’ll spend mere minutes actively working – nature handles the heavy lifting.
My pantry staples now include simple ingredients that birth endless flavor possibilities. Forget complicated equipment: a glass jar, cloth cover, and patience are your main tools. That rubbery pancake-like culture floating in the brew? It’s simply a symbiotic community working tirelessly to boost your gut health.
This guide demystifies every step, from initial setup to flavor experimentation. You’ll discover how homemade versions outshine store-bought options in cost and customization. Let’s turn your kitchen into a probiotic workshop where science meets creativity – one bubbly batch at a time.
Understanding Kombucha: A Journey Through Probiotic Benefits
My journey into fermented beverages began when I discovered kombucha’s unique biological dance. This living drink forms when yeast and bacteria cultures transform sweet tea through symbiotic fermentation. The result? A tangy elixir teeming with probiotics that colonize your gut like microscopic gardeners.
These active cultures do more than aid digestion. Research suggests they may influence weight management by optimizing nutrient absorption. Each sip delivers antioxidants from tea leaves, particularly polyphenols that combat oxidative stress. During fermentation, B vitamins emerge naturally – a nutritional bonus absent in unfermented teas.
What surprised me most was kombucha’s minimal alcohol content. The fermentation process typically keeps ABV below 0.5%, making it safer than most fermented drinks. However, its potency demands moderation – overindulgence can overwhelm sensitive digestive systems with live cultures.
Compared to yogurt or sauerkraut, kombucha offers distinct advantages. Its liquid form allows faster nutrient absorption, while the tea base provides unique plant compounds. The effervescence adds sensory appeal missing in many probiotic foods. Just remember: start with small servings to let your microbiome adjust gradually.
Why Brew Kombucha at Home: Benefits and Personal Experience
What if your daily probiotic ritual could pay for itself? Commercial versions drain wallets at $4+ per bottle, while DIY batches cost less than a latte. My kitchen experiments revealed staggering savings: $0.25 per 16oz versus $4 retail. Multiply that by weekly consumption, and you’re funding a year’s supply with three months’ grocery budget.

Financial Freedom Through Fermentation
| Expense | Store-Bought | Home Brew |
|---|---|---|
| 16oz Bottle | $4.25 | $0.18 |
| Monthly Cost (4 bottles/week) | $68 | $2.88 |
| Annual Savings | $782+ | |
Flavor Exploration & Quality Control
Sarah Thompson, founder of Brew Buch, notes: “Commercial producers prioritize shelf stability over boldness. Home crafters unleash creativity – think lavender-peach fizz or ginger-turmeric spark.” Her 50,000-strong Kickass Kombucha Brewers community shares wild successes like blueberry-basil blends.
Controlling ingredients became my superpower. No mystery “natural flavors” – just organic teas, raw sugars, and fresh fruits. Watching friends’ eyes light up when sharing my mango-habanero creation? Priceless.
This journey taught me fermentation science while building connections. SCOBY sharing became my favorite housewarming gift, sparking probiotic conversations nationwide. Your kitchen transforms into both laboratory and artist’s studio.
Ingredients Essentials for a Homemade Kombucha Recipe
Selecting the right elements transforms simple components into a probiotic masterpiece. Through trial and error, I discovered three non-negotiable pillars: quality H2O, proper tea leaves, and pure sweeteners. Each plays a distinct role in nurturing microbial communities.

Tea, Sugar, and Water Fundamentals
Your liquid foundation matters more than you think. Chlorine-free H2O protects delicate cultures – I use filtered or spring water. For tea, stick to traditional varieties:
| Batch Type | Water | Tea Bags | Sugar |
|---|---|---|---|
| SCOBY Creation | 7 cups | 4 black | ½ cup |
| First Ferment | 14 cups | 8 black/green | 1 cup |
Plain black or green varieties work best. Herbal blends often lack nutrients cultures need. White sugar isn’t negotiable – it’s the fuel microbes consume during fermentation. Don’t fear sweetness residue; cultures devour 80%+ during the process.
Selecting the Perfect Starter Liquid
That murky store-bought bottle? It’s gold. Look for raw, unpasteurized versions with visible sediment. My first batch used GT’s Original Synergy – its active cultures jumpstarted fermentation in 48 hours. For subsequent batches, reserve 2 cups from your previous brew.
Organic ingredients minimize chemical interference. While not mandatory, they create cleaner flavor profiles. Local health stores often carry suitable starters, but check labels for “live cultures” and avoid anything pasteurized or flavored.
How to Brew Kombucha: Step-by-Step Process
Creating probiotic-rich fermented tea begins with precision in your initial setup. The magic happens when heat, time, and ingredients align to nurture microbial activity. Let’s transform basic components into a thriving ecosystem.

Easy-to-Follow Brewing Instructions
Start with 14 cups of filtered water in a stainless steel pot. Bring to vigorous bubbles – this sterilizes your base. Kill the heat immediately, then submerge 8 black tea bags. Set a timer for 15 minutes while aromatic tannins release.
Fish out the tea bags once steeped. Stir in 1 cup granulated sugar until crystals vanish completely. Here’s my trick: boil only half the water initially. After dissolving sweetness, mix in chilled H2O to accelerate cooling. Test liquid temperature with your wrist – lukewarm means go-time.
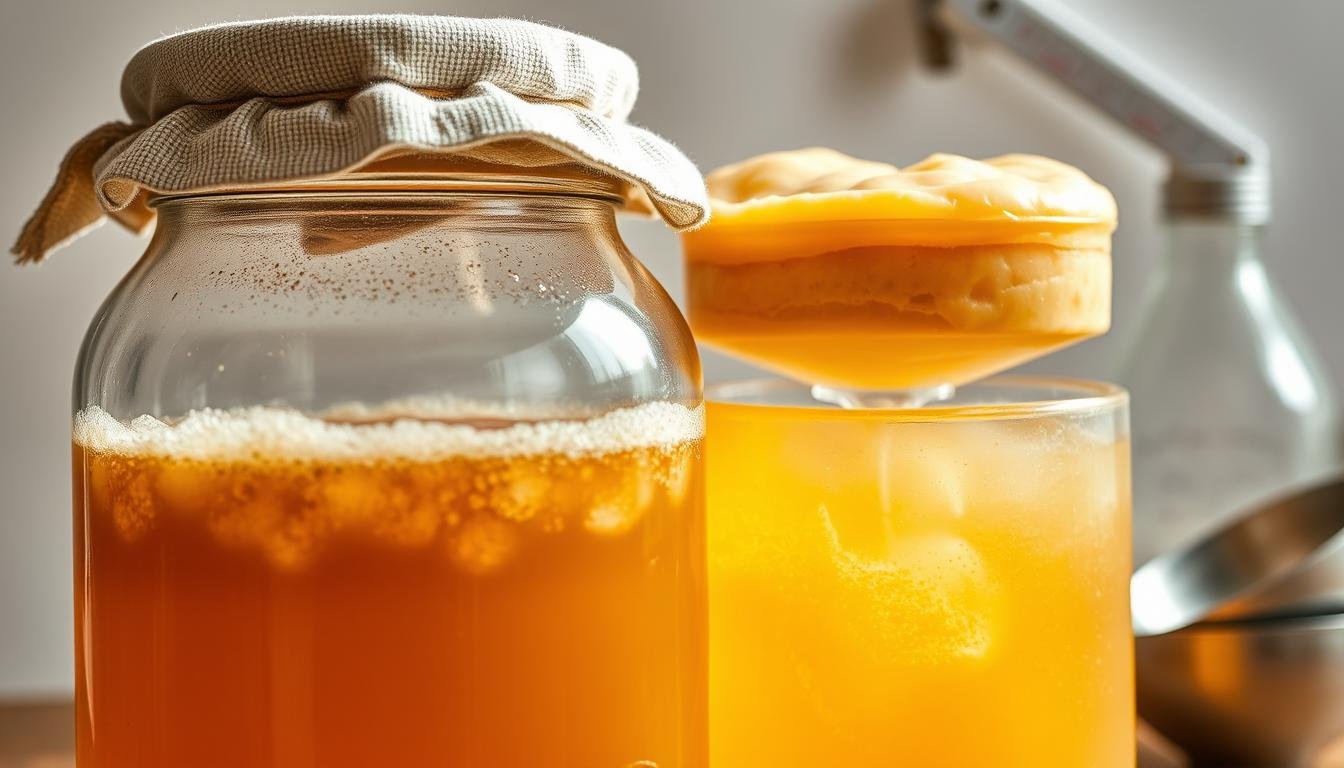
Transfer the amber liquid to a spotless glass jar. Combine with 2 cups starter tea from your last batch or store-bought raw version. Gently slide the rubbery culture on top. Cover tightly with breathable fabric secured by rubber bands.
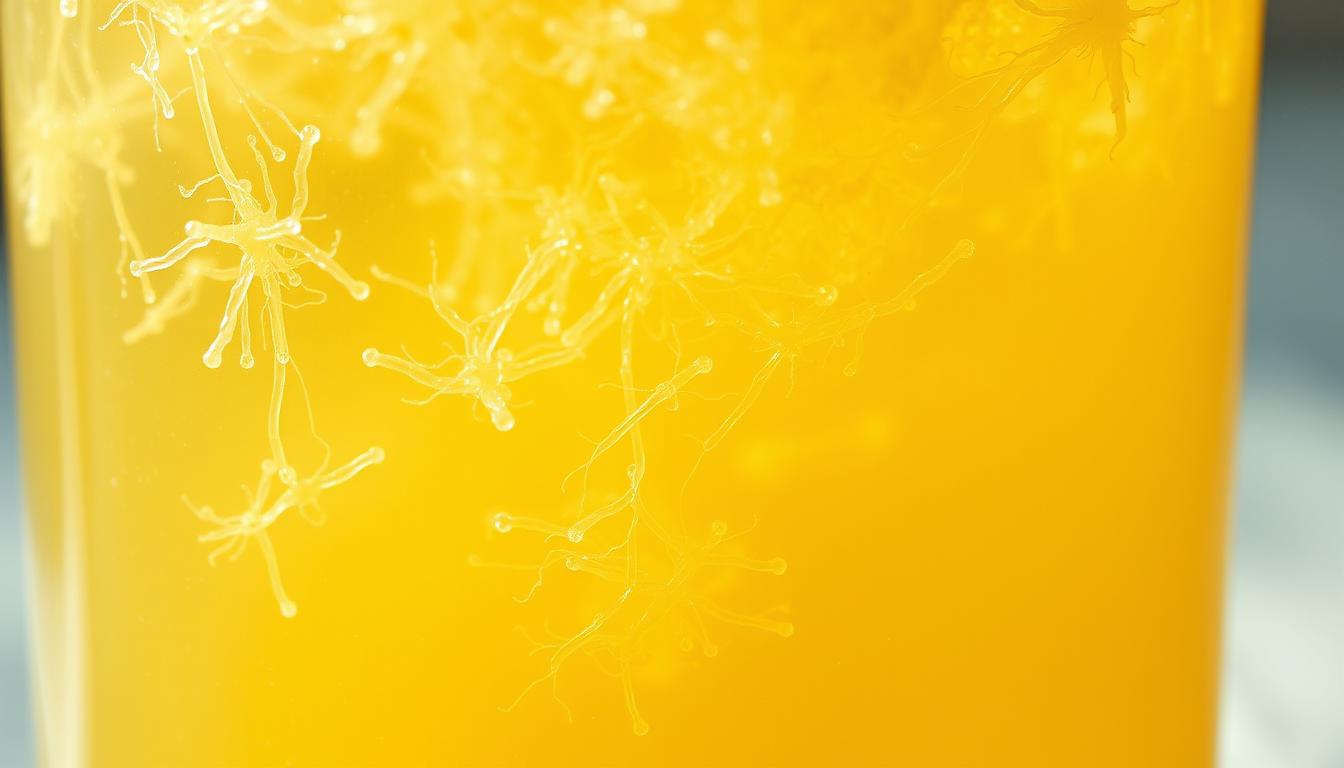
Position your vessel in a 70-75°F corner away from sunlight. My pantry shelf works perfectly. Within days, translucent strands will dangle beneath the floating disk – visual proof of active fermentation. Resist peeking for 7-10 days while nature works.
Creating and Maintaining Your Kombucha Scoby
That rubbery disk floating in your jar isn’t just a brewing tool – it’s a living ecosystem. The Symbiotic Culture of Bacteria and Yeast (SCOBY) acts as your fermentation powerhouse, converting sugars into tangy probiotics through microbial teamwork.
Cultivating Your First Culture
Start with cooled black tea mixed with raw, unflavored kombucha. I used 2 cups starter liquid per gallon jar during my first attempt. Within days, a translucent film formed on the surface – the birth of your bacteria-yeast alliance. Full maturation takes 3-4 weeks, developing into a ¼” thick disk that mirrors your container’s shape.
| Stage | Appearance | Timeline |
|---|---|---|
| Initial Growth | Cloudy film | 3-7 days |
| Active Formation | Opaque layers | 2-3 weeks |
| Maturation | 1” thick disk | 4+ weeks |
Nurturing Your Microbial Partner
Don’t panic if your culture sinks or develops brown strands – mine resembled a jellyfish during early phases. Healthy SCOBYs come in all shapes. When handling, I wear clean gloves to prevent contamination. Once reaching 1” thickness, gently separate layers to create backups. Store extras in sweet tea at room temperature, refreshing monthly.
My “SCOBY hotel” now houses six cultures in a large glass container. This living library ensures continuous brewing potential. Remember: imperfect appearances often signal robust activity. Those bubbles rising through the tea? That’s your microbial workforce clocking in.
First Fermentation: Transforming Sweet Tea into a Tasty Brew
The magic happens when sweet tea becomes alive with activity. During this 6-10 day phase, beneficial microbes convert sugars into tangy probiotics. Temperature control proves critical – maintain 70-75°F for optimal results. Too cold? Fermentation stalls. Too warm? Yeast dominates, creating off-flavors.
Tracking Progress & Flavor Development
| Days | Visual Clues | Taste Profile |
|---|---|---|
| 1-3 | Bubbles form under SCOBY | Sweet, tea-forward |
| 4-6 | SCOBY thickens, yeast strands appear | Balanced sweet-tart |
| 7-10 | New SCOBY layer forms | Vinegary, slightly effervescent |
Start sampling on day 6 using a clean straw. Gently push past the rubbery culture to reach liquid gold. My trick? Compare daily tastes in shot glasses. The perfect balance arrives when sweetness whispers beneath tartness.
Harvest time approaches when flavors align with your preference. Always reserve 2 cups of finished liquid for future batches – this starter contains active cultures. Store it with your SCOBY in a glass container until next use.
Seasonal changes affect timelines. Summer batches often finish 2 days faster than winter brews. Adjust expectations based on your environment, and remember: patience yields the most vibrant fermented tea.
Second Fermentation: Adding Fizz and Flavor
My pantry shelves transformed into a flavor laboratory during this phase. The second fermentation unlocks endless customization while building that satisfying fizz. This stage requires airtight containers and creative combinations to achieve signature effervescence.
Flavor Infusions and Sweetening Ideas
I experiment with 1-2 tablespoons of mashed fruit per cup of liquid. Blueberry puree creates jewel-toned bubbles, while candied ginger adds spicy warmth. Raw honey introduces floral notes – just avoid pasteurized varieties that lack active enzymes.
Mango chunks became my surprise star ingredient. Their natural sugars fuel carbonation while imparting tropical sweetness. Always strain solids after 3 days to prevent over-fermentation. This method works with juices too – tart cherry creates bold complexity.
Bottle Conditioning for Perfect Carbonation
Switching to flip-top glass vessels revolutionized my results. Leave 2 inches of headspace for pressure buildup. Store bottles at room temperature 3-10 days – burp daily after day 5 to check progress. Pro tip: refrigerate one test bottle early to compare carbonation levels.
Patience rewards with fine bubbles that rival champagne. When achieving desired fizz, move all bottles to cold storage. This halts fermentation while preserving flavors. Your signature recipes now await sharing – or become cherished kitchen secrets.