

Last Thursday, I found myself staring at an empty fridge at 5:30 PM while my kids debated whether cereal counted as dinner. That’s when I remembered the ground beef tucked behind the milk carton – and the solution to our ”what’s for dinner?” crisis.
My method transforms basic ingredients into something magical. Lean beef gets mixed with caramelized onions and a secret blend of spices, while a zesty glaze locks in moisture during baking. What emerges isn’t just food – it’s comfort served on a platter.
Through years of trial (and occasional dry-loaf disasters), I’ve perfected techniques that guarantee juicy results. The key lies in balancing texture and flavor without complicated steps. You’ll need just 10 active minutes before popping it in the oven.
This dish does more than fill hungry bellies. It creates those ”remember when…” moments families cherish. Leftovers? They become next-day sandwiches that taste even better – if there’s any left!
Whether you’re feeding picky eaters or impressing unexpected guests, this approach adapts effortlessly. Let me show you how to turn ordinary ingredients into your new family favorite that’s both nostalgic and practical for modern life.
My Journey to the Perfect Meatloaf
What started as a desperate attempt to please picky eaters became a culinary obsession. I tested over 30 variations of this dish, determined to crack the code for a family favorite that delivered both taste and texture.

Early attempts taught me valuable lessons. Many classic versions used 80/20 ground beef, which left pools of grease in the pan. Switching to 90% lean meat solved the sogginess issue while maintaining juiciness. The real breakthrough came when I treated ingredient ratios like a science experiment – measuring how breadcrumbs absorbed moisture or how spices bloomed during baking.
Three critical discoveries shaped my approach:
- Caramelizing onions doubles their sweetness without adding sugar
- Resting the mixture before baking lets flavors meld
- A glaze applied mid-cooking creates protective caramelization
Through months of tweaking, I realized great cooking isn’t about fancy techniques – it’s about mastering fundamentals. This dish now earns requests for seconds, even from my toughest critics (my kids). The repetition paid off: what began as a basic recipe evolved into our most requested comfort food.
Essential Ingredients for a Flavor-Packed Meatloaf
Great meals start with quality components. Through testing countless combinations, I discovered three elements that make or break this dish: protein quality, binding agents, and balanced flavor enhancers.

Selecting the Best Ground Beef and Breadcrumbs
I use 80/20 ground beef – enough fat for richness without greasiness. Higher ratios create pools of oil during cooking, while leaner blends dry out. For every 2 pounds of beef, I mix in ¾ cup Italian-seasoned bread crumbs. They act like sponges, absorbing juices while adding subtle herbs.
| Fat Percentage | Texture | Moisture Level |
|---|---|---|
| 70/30 | Greasy | High fat separation |
| 80/20 | Balanced | Optimal retention |
| 90/10 | Dense | Requires extra binder |
Enhancing Flavor with Seasonings and Glaze
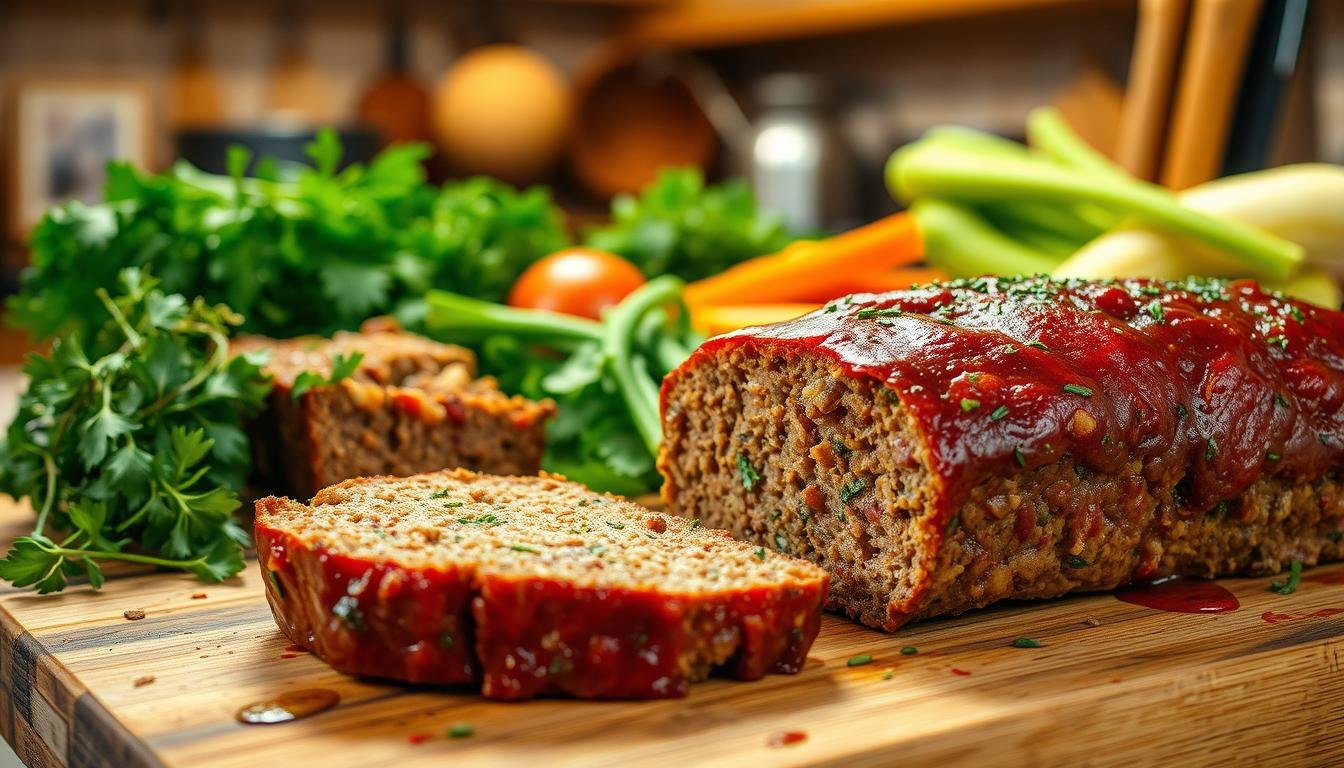
My spice blend combines Italian seasoning, parsley, and black pepper. But the real star is the glaze: equal parts ketchup and chili sauce with brown sugar. The chili sauce adds tang that regular ketchup can’t match. Applied halfway through baking, it caramelizes into a sticky-sweet crust.
Fresh herbs make a noticeable difference. Dried parsley works in a pinch, but chopped green onions add brightness. Always taste the mixture before shaping – your hands know when the ingredients harmonize perfectly.
Simple & Delicious Weeknight Meatloaf Recipe
Creating memorable family meals shouldn’t require complex techniques. My go-to dish combines pantry staples with smart preparation for consistent results every time. Let’s break down the essentials that make this approach foolproof.

Start with two pounds of ground beef – enough to feed eight but easy to halve. I prefer 85% lean for optimal texture. The magic begins with diced onion sautéed in butter until golden. This step unlocks natural sweetness while keeping the final bake moist.
| Ingredient | Role | Pro Tip |
|---|---|---|
| Eggs + Milk | Binder | Whisk before mixing |
| Bread Crumbs | Texture | Soak in milk first |
| Chili Sauce | Glaze Base | Adds tangy depth |
Combine two eggs with ¾ cup milk for a creamy base. Italian-seasoned crumbs absorb this mixture, creating what chefs call a panade – your insurance against dryness. A splash of Worcestershire sauce in the meat blend adds umami richness without overpowering.
The glaze takes three minutes to make: equal parts chili sauce and ketchup with brown sugar. Brush it on during baking to form a caramelized crust. What emerges from your oven will be tender, flavorful, and begging for seconds.
Step-by-Step Instructions to Make Meatloaf
Transforming humble ingredients into a crowd-pleasing dish requires smart technique. Follow these steps to avoid common pitfalls and achieve perfect results every time.

Preparing the Meat Mixture
I start by preheating the oven to 350°F. A rimmed baking pan gets lined with foil and lightly greased – this catches drips while preventing sticking. While the oven warms, I melt butter in a small pan and cook diced onions until they turn golden. Cooled onions add sweetness without making the mixture watery.
In a medium bowl, I whisk eggs and milk before stirring in breadcrumbs. Letting this sit for 10 minutes creates a sponge-like base that locks in moisture. When adding ground beef, I use a folding motion – overmixing creates toughness. The secret? Stop when no pink streaks remain.
| Step | Time | Key Tip |
|---|---|---|
| Onion Prep | 8-10 minutes | Cool completely |
| Breadcrumb Soak | 10 minutes | Use timer |
| Mixing | 1-2 minutes | Stop at cohesion |
Baking and Finishing with the Zesty Glaze
Shaping the mixture into an 8×4″ loaf on the prepared pan ensures even cooking. After 40 minutes in the oven, I brush on the glaze – this timing prevents burning. The final bake takes 15-30 more minutes, depending on your oven’s quirks.
I always verify the internal temperature reaches 160°F. Resting for 10 minutes before slicing lets juices redistribute. What emerges is tender, flavorful, and begging for mashed potato companionship.
Tips and Tricks for Keeping Your Meatloaf Moist
Nothing ruins a family meal faster than dry, crumbly results. Through years of testing, I’ve discovered moisture preservation starts long before the oven preheats.

The Science of Soaked Breadcrumbs
My secret weapon? A panade – breadcrumbs soaked in milk. This paste acts like a moisture reservoir during baking. I let mine hydrate for 10 minutes while prepping other ingredients. The difference between dry and juicy often comes down to this simple step.
| Ground Beef Type | Fat Content | Moisture Outcome |
|---|---|---|
| 70/30 | High | Greasy, shrinks significantly |
| 85/15 | Balanced | Optimal juiciness |
| 93/7 | Low | Requires extra binders |
Many assume higher fat means more moisture. In reality, excess grease drains away, leaving meat parched. I use 85% lean ground beef – enough richness without the pool of oil.
When combining ingredients, treat the mixture like fragile dough. Overworking develops tough proteins. I mix just until cohesive – about 15 folds – then shape into a loaf with slightly rounded edges for even cooking.
The final act happens after baking. Letting the dish rest minutes allows juices to settle. I wait 10-12 minutes before slicing – the steam you see escaping? That’s precious moisture staying right where it belongs.
Serving Ideas and Comfort Food Pairings
The right sides turn a satisfying main into a memorable meal. My go-to combination pairs golden mashed potatoes with steamed peas – a classic American dinner that feels like edible nostalgia. The creamy spuds catch every drop of glaze from the loaf, creating perfect forkfuls.
For texture contrast, I roast vegetables until caramelized. Crispy Brussels sprouts or honey-glazed carrots add color and nutrition. These earthy flavors balance the dish’s richness without overpowering it.
No comfort food spread feels complete without fresh bread. I often bake a crusty loaf to serve warm with butter. Family members use slices to mop up leftover sauce – it’s become our favorite ritual.
Three winning combinations:
- Garlic-herb mashed potatoes with roasted green beans
- Hedgehog potatoes (crispy on the outside, fluffy inside)
- Buttered cornbread muffins and tangy coleslaw
Leftovers shine in creative formats. Sliced portions become hearty sandwiches with melted cheese or get crumbled into pasta bakes. This versatility makes the dish ideal for busy family schedules – one preparation fuels multiple food adventures.
Storing, Freezing, and Reheating Your Meatloaf
The real magic of this dish reveals itself when the oven timer dings – but smart handling ensures every slice stays as tender as the first. Proper storage methods preserve texture, while reheating tricks revive that fresh-from-the-oven appeal.
Smart Storage and Freezing Techniques
Cool your loaf completely (about 30 minutes) before wrapping. I use foil followed by plastic wrap to lock in moisture. For freezing, slice portions first – this saves time later and prevents thawing the entire batch.
Place slices on a parchment-lined pan, freeze until solid, then transfer to airtight bags. Label with dates – frozen portions stay perfect for 3 months. Always press out excess air to avoid freezer burn.
How to Reheat Without Losing Moisture
My go-to method: place slices in a baking dish with ¼ cup broth. Cover tightly with foil and warm at 325°F for 15-20 minutes. The steam keeps everything juicy. For single servings, microwave on 50% power with a damp paper towel – 90 seconds usually does the trick.
Never reheat directly in the oven uncovered – it dries out fast. If cooking from frozen, add 5 extra minutes and check internal temp. Leftovers transformed this way taste like you just pulled them from the heat.